Hello again! This week, I have something I hope will be a little more interesting. I had an effect I wanted to test out, and it turned into less of a test and more of a project. Since I took pictures step-by-step, this post will be something of a how-to!
There isn't all that much to say about the theater. I've had more to do this week, now that the show has gotten going, though not to do with the show. Mostly, my week has been spent helping organize things around the place. It's been nice to be a little more useful, though, and I've gotten to hear more about the goings-on.
Apologies in advance- the bit below got long. To summarize in advance, it's a mix of tutorial and opinion, and something of an experiment.
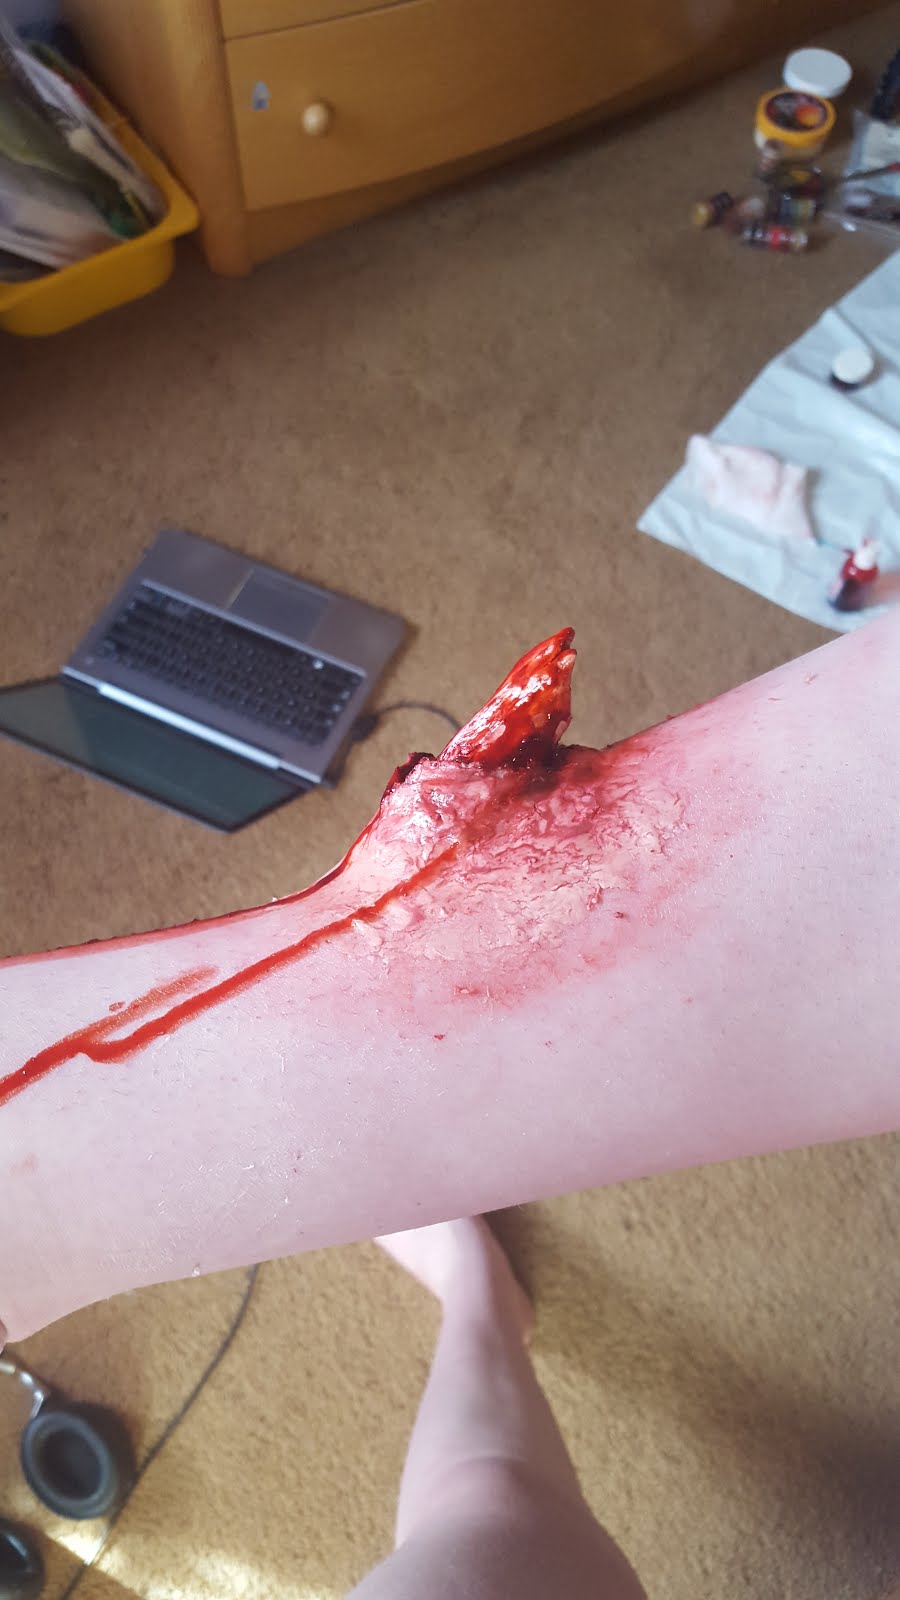
The effect I was hoping to make was based on one of the videos I included a few posts ago, with the tutorial for a wrist fracture kind of effect. I didn't make exactly that, for a few reasons, but I did make an exposed broken bone effect. Before I go into how it was made, here's couple of pictures of the thing itself:


So how was it made? I made the bone part of it separately out of white clay, first, and coloured it with grease-based colour. Here's that, before and after I coloured it:


 The main colours for the bone are these three: yellow, black, and dark red (the one I'm pointing to). The yellow was for the surface of it, while the other two were for the 'marrow' part of it.

The next step is making the injury itself. I used liquid latex and cotton pads, torn into fluff (which is definitely the official term), for the base of it. For anyone who wants to do something like this but hasn't worked with latex before, here's a tip- before you put it on your skin, use some kind of cream. It doesn't matter what it is, anything that moisturizes will make things easier when you try to take it off.
It took some time for it to dry, because of all the latex the cotton had absorbed.


Next, I added colour inside, where the bone would be covering, and I sealed it some:

 When I colour injuries, I usually start with a lighter red as a base, then use a darker one for the edges, to add depth.This part isn't entirely necessary, because the bone piece covers most of it, but it adds something if you're looking closely.

As you've likely noticed, the latex mix doesn't look much like skin. I did try to colour it to be closer, but because of the texture of it, any colour shows up quite clearly as colour, rather than blending into the skin. To smooth it, I decided to cover it over with scar wax.
What's scar wax? This stuff! (The pink stuff.) The best way to work with it, I've found, is to mix it with a cream of some kind. It makes it easier to work with and keeps it from sticking to your hands. Because I'm pretty pale, I had to lighten the wax, but it's not hard to do. Any grease makeup will mix in fine, and if it goes too light, it's easy to mix in more wax. Applying the wax over the latex was fairly simple, because it didn't need an adhesive- the wax could stick on its own to the surface. Here's after I covered it over in wax:


Then, once again, the next step was to colour. In order to make the skin look swollen, I used the lighter red, spread both on the wax and a little way beyond.


 After colour, there's only one more step: blood. I used two types of fake blood: a gel and a liquid. Another word of warning: some kinds of fake blood do stain. The kind I used most for this is one that does, the cheaper kind they sell at party city by the gallon, does stain, so if you care about that sort of thing, use one like the brand Ben Nye. It comes off better, and it's also thicker, so it's cool for dripping effects.

Last, the fun part: adding on the liquid fake blood. The nice thing about this piece in particular was that because of its shape, it was hard to add too much- the blood would just run down the bone, through the latex and wax, and that was it. There is such a thing as adding too much blood, though, and it's a hard mistake to fix, so blood is a thing to be careful with.
The end result of that is at the top, but here's a couple more.

(And here's a bonus picture of the bone, once I dismantled the piece.)

And that's that! I might do an actual video in the future- I do realize this was lacking some details and things. Do let me know if this was interesting to see, so I know whether to do a step-by-step again or not. Part of the reason why I didn't take a video was because this entire piece was mostly a way to learn how to use cotton and latex- all of this was experimental, and I'm especially happy with this because of all the new techniques it helped me figure out.
Shout-out to my cat, who kept me company for part of the three or more hours it took to do this!

Thanks for reading! Hopefully, I'll have some new things to show off next week!
Jeez! I'm still shocked anytime I see makeup that realistic! You're doing an absolutely amazing job and I hope you keep rocking it!
ReplyDeleteWow Hannah, this is crazy good! Doing my srp in orthopedics, I've seen some crazy pictures of compound fractures (open fractures), and this looks just like another one of those pictures. Keep up the good work, these pictures were awesome!
ReplyDeleteI just google searched "compound fractures", and kind of wish I hadn't, but I would agree! Hannah's special effects look very real!
DeleteThat was insanely realistic. I've always appreciated good art of any kind, and its hard to not consider that a type of art. Keep it up.
ReplyDeleteWhoa Hannah, this is awesome! I love how you provided photos throughout the process. Would you say that it is more difficult to do special effects makeup on yourself rather than someone else?
ReplyDeleteIt's actually easier to do things on myself. Sometimes, it can be a little annoying, but I'm more willing to test new things on me than on someone else.
Delete