Thursday, April 28, 2016

Encore

Hello again! Apologies if the font is off, I'm sending this from my phone, and I don't know how to fix it. Thank you, to everyone who's been reading my posts! Here's the link to my presentation:

https://docs.google.com/presentation/d/1nHTglLdtLDEkMNEKmZQrIr1qnYb42KWIx1Ip0qrEQ9g/edit?usp=docslist_api

Thanks again!

Monday, April 18, 2016

And an anticlimactic ending

If I had realized this was the last required post, I would have made sure I had something to show off, I really don't have much to say this week. I didn't do much at my internship this week, and I didn't get the chance to do anything with makeup either. I might post something next week if I get anything together as a finisher, but any makeup I make after that will just need to be seen in my presentation.

Things are going smoothly at the theater, as far as I can tell. 9 to 5 has started, Glenngary is ongoing, and though there are a few details still being ironed out, we've moved back to cleaning up around the theater now that the pre-show preparations have ended.

As for my makeup, here's a few things I'd love to get done, if I have the time and a model to work with:

1. The second part of the cyberpunk concept, or more
I have an idea for a face piece, which might also include a neck part if I'm working on someone other than myself. It will be based on the same concept as the arm piece, and if I get the chance to work on a cleaner concept for that, I might do that too.

2. A full-body zombie idea
I mentioned this last week, but it's dependent on my friend's time. It would definitely include nails and some kind of face piece, but might also include something like the spine effect from before or, if I can figure out how to make it, something on her stomach. I have a few ideas- whether I'll be able to test them is the problem.

If I had the time and the people, it might also be cool to do some kind of multiple person accident scene, but time's run out a lot faster than I expected, so that's likely not happening.

Thanks to everyone who's followed my blog until now!

Sunday, April 10, 2016

Whatever Happened to 4/8/16?

Hello all! I return to this blog a year older than I was the last time I posted- that's how it works, right? I ought to have had this up on my birthday, so apologies, but if I had posted it then, I wouldn't have had pictures to go with it. Now, I do.

First, though, to the theater. Things have been fine, if busy. This past week was tech week, leading up to Friday's opening night for 9 to 5. That meant a lot of last minute painting and props and very little actual watching runs, unfortunately. Hopefully, the run went well- I'll have to find out on Monday.

Back to makeup! I've done two things this week. One is a concept for my cyberpunk idea, which I tested out this evening and which was more planning than actual final product. I didn't do much to match the colour of the wax to my skin tone, so it's a little obvious it's an applied piece, but like I said, it's more a proof of concept than anything. If I have time to revisit that particular idea, I'll make it more neatly.

Here it is, below:
                              

I have other plans for a face piece, and also possibly more, if I can get my model's time again.

Because it was so rough, I didn't do a step-by-step, but the whole thing is pretty basic: gray paint with blue sparkles to make it look metallic, with a border done in wax. The wax was also enough to hold the wires in place, so I didn't really need any adhesive for this.

As for the other piece, I had a friend over for the weekend, so of course I had to do her nails.


(Thanks again to Skye!)
I did take more step-by-step pictures for this one, but there were very few steps. First, I had to cut fake nails to the size and shape of my model's, then cut any breaks or cracks I wanted to have. That, I took no pictures of, but in a few other, closer pictures, where I cut is more visible. I coloured the area around the actual nails red, with dark red at the place where skin meets nail, then glued them down with eyelash glue on the fake nails and gel blood over her nails- it's thick and sticky, so it actually worked quite well, for the short time she had them on, and it had a bonus effect later on, which I'll show.
Here's just the nails, without the zombie colour to her skin.
  
I also added some black around the edges of the nails and the cracks before I put them on her, to make them look dirty, and added a mix of red, yellow, and purple to give them the right colour and make them more opaque.
Here's a few more with the zombie colour I added to her skin (a mix of green and purple):
  

And without the nails:
 

All in all, this week was pretty productive, in terms of makeup concepts. I've also been told that if I wanted to make the above friend fully into a zombie, I could- if I have the time to, that will either be on my blog or in my presentation!
Thanks for reading, and sorry this is so late: I had some problems getting the pictures to the right place this week.

Sunday, April 3, 2016

This Reminds Me of a Title (The I won't pretend it's 4/1/16 edition)

Hello again! Sorry, no pictures again this week. Things happened, and I didn't get a chance to. I'll definitely have some up for next week, because I need to add more to what I have up. I have one idea, in particular, that I would have tried today if I hadn't wound up with paint on my hands where makeup would have gone because of the painting at the theater today.

Desert Stages is headed into another show, 9 to 5, and that means another tech week. This Monday to Thursday will be runs to get the last of the bugs out of the show so it can open on Friday. We spent today painting the set for community day, and I got to help set up the lights for the show before that.

I don't have much new to say on makeup, since I didn't get a chance to work on it much. I still hope to figure something out for my kind of cyberpunk idea, though I don't know how well I can work the materials I have into something like that, and I have a couple of other ideas, one for how to make a tendon for certain effects and the other for a zombie nail effect.

Sorry this is so short. I'll try to get a few things up during the week to make up for it. Thanks for reading!

Saturday, March 26, 2016

Let's Hear It For the 25th of March 2016

Hello! I don't have a project to show off this week, but I do have a little more to say about the theater this week and a concept I'm looking forwards to trying my hand at with some new materials a friend offered up. More on that later, though.

Things have been moving steadily towards the new productions, at the theater- at least, towards the one I've been more involved with. I don't know how it went, but opening night was this Friday- hopefully, it went well. Because of that performance, this week's been tech week, when all the last details are hurriedly hammered out before audiences arrive. I helped paint more of the set, doing touch-up work more than anything, and also painted a few props. In doing so, I've gotten to learn a few cool techniques that actually could come in handy for a few special effects, so it was pretty interesting to learn. I also helped get more props for the show which turned out to be more complicated than one would think- ash trays in particular are surprisingly hard to find.

While I interned during the week, I also got to watch most of a run-through of the show, Glengary Glen Ross. It's a satire on salesmanship with an interesting plot and an honestly impressive amount of swearing, and getting to see it was nice.

On to my new idea. I mentioned back at the start of this that I wanted to create a steampunk effect, but the biggest problem with that was in what I had- or rather, what I lacked. Without gears and the like, it would have been difficult to create. Recently, though, a friend offered up a broken laptop for me to dismantle for pieces for a similar concept: cyberpunk. I've got all the parts I could need for it and more, so I've been beginning to consider some possibilities.I'll still need to do some concept research, but I'm pretty excited about trying it out, and taking apart a laptop has been more than a little fun too.

I did also do one little concept sketch for something a little less 3D than I normally do, inspired by the painting I'd been doing at the theater for a set meant to look like a Chinese restaurant. It's a little messy, but I'll post a picture- it's meant to be something of a dragon look. I doubt I'll take it further than this, but it's still an interesting possibility, with the right materials.


That's all for this week! Talk again next week, and I'll hopefully have more to show then!

Saturday, March 19, 2016

Title of Post, the 3/18/16ish Edition

Hello once again! I'm back from break with another makeup piece! I didn't get two done this week, but I did manage to get together the most difficult piece, in my eyes, that I've made so far. I'll talk about that in a bit.

Things have been going well at the theater: Desert Stages is headed towards the start of several new performances, and I've gotten to help paint the walls of the newly emptied theater to prepare for the new set that will come with a new show, Glengarry Glen Ross. It's been interesting to watch the prep for a coming show: there's a lot to do, from making sets to finding props and costumes to deciding how set pieces should be laid out on the stage. I've watched a stage go from two floors to one, with the removal of a stage build, and it's been really cool to see how much a space can change with a few things added and removed.

As for makeup, this week I had a little help from a friend. (Thanks Skye!) The piece I made is meant as part of a zombie look, though it's the only piece I made. My initial plan was to try to make her up entirely as a zombie, but I underestimated the time it would take by quite a lot before I actually began.

One thing I haven't addressed much so far is time, so maybe I should talk about it now. Making makeup effects isn't fast. To give some context, here's a list of approximate times:
The bandage-and-blood effect from last week is the fastest thing I know how to make- it only takes as long as it takes to wind bandages and let fluid drip- but anything more intensive takes time. A small bruise can take five to ten minutes, but a bigger one or a darker one or one in more complicated shapes (like hand-prints) can take upwards of thirty minutes. A cut or bite done only in colour can take anywhere from twenty to fourty minutes, if there are no breaks and no mistakes. Anything with latex involved takes longer- the liquid has to dry before it can be shaped or coloured, and when latex is mixed with cotton, that can take at least ten minutes, if not more. A small burn effect, made with latex and colour, can take thirty to fourty minutes, and bigger ones can take more than an hour. The missing eye effect I made took two hours, and the broken bone one took about four, including the time spent forming the bone. When I last made a zombie effect, I had to work on two people at once, but three latex injuries on one person and two and a quick bandage on the other, together with getting everything zombie coloured, took three hours. Anything more detailed would take longer.

The effect I made this week took seven hours total to make (not including the one to two hours of research time): three to make the bones, and four for the actual application, only made possible by the fact that my model was willing to stay still for that long. To create a full zombie effect around this, it would likely take something closer to five or six hours, so as much as I'd like to have done that, it wasn't possible at present.

To the actual makeup, though. I was hoping to create an exposed spine effect- maybe from an injury to a zombie's back or maybe because the skin got too damaged and split. I'll say this ahead of time so I don't get comments on it- because of the placement, there will be pictures of a back.

 Here's a picture of the finished product!


Now to its creation!

The steps this time were very similar to those needed for the broken leg effect. First, I had to make the bones. This was a lot of where the research came in: I had to figure out how to shape the clay I used into thoracic vertebrae and how they would overlap. I made each of the bones separately so they could move together better, but this did take quite a bit of time and effort, and in the end, I did have to make one more bone to make everything fit right. Here's the bones uncolored, first:


Then made to look more like bone:
 

And finally, made to look a little bloodied. I did this, for this one, because I knew that once the spine was in place, there would be a lot of places I couldn't reach to colour.


Once the bones have been made, they can be applied whenever.

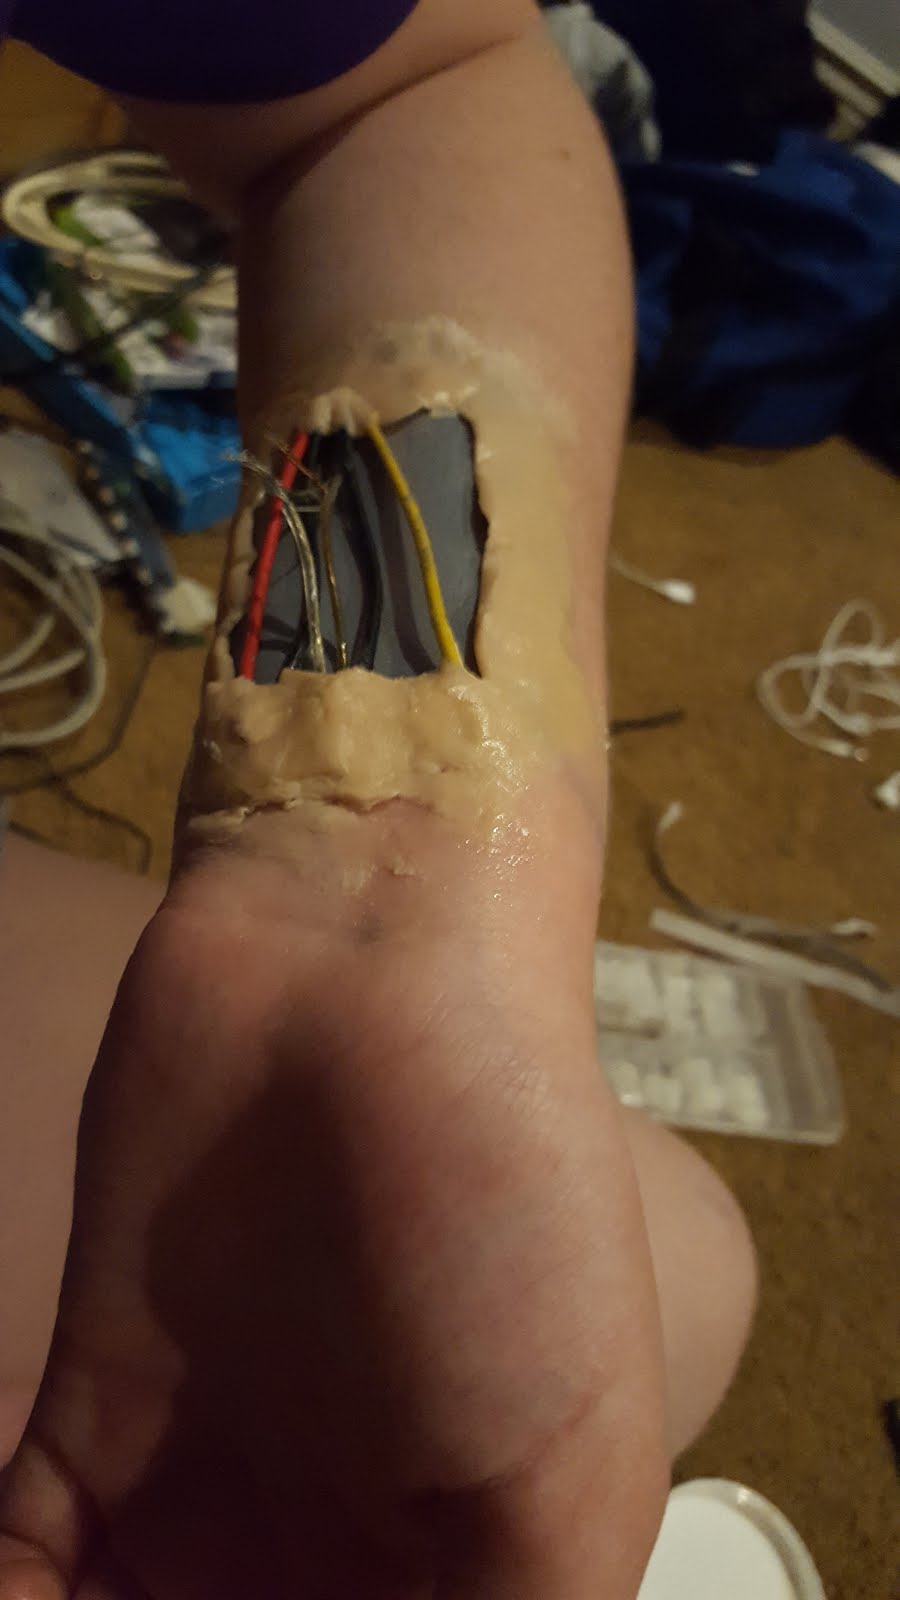
The next step, when we got going, was to make a latex and cotton base for the piece that would hold the bones in. Here's the piece in a few stages:


The important thing in this step was less the appearance of the pocket and more its ability to hold the bones, so thought this may look messy, it doesn't matter later on. Unfortunately, I don't seem to have any pictures of the hole with the inside coloured in, which was the next step, but it looked a lot like the leg wound one did at this stage.
After that came fitting the bones into the latex. This took a little doing, because I made one fewer bone than I should have. To fix this, I made a partial bone to go under the last fully formed one- if you look, it's visible at this stage, in the side-view pictures..


Next came the wax. Here, it was even more important than in he broken leg effect- because I made the spine come out so much, I had to try to make it look like the vertebrae at the top and bottom continued under the skin. Unfortunately, I'm not certain I was entirely successful, but at least I know for any future attempts I might make.
Here's with the wax:


Then, with colour added:


The next step is where things get new. I tried a new way of making skin look like a zombie's by dappling colour with a wedge. Here's the result:


The last steps were the usual: blood, in two forms. First came gel blood.


Then, last of all, liquid blood.


There's the step by step! The appliance itself turned out well, too. Even once it was off, it was pretty cool to look at.
 

Thanks for reading, as always! This one got pretty long, but I wanted to give another step-by-step. Thanks again to my model- this piece took a lot of patience to sit (lay) through.
Until next time!